Monday, August 12, 2013

Greek Style Chicken Burgers w/ Tzatziki Sauce


Serves 4

Recipe Level: Easy


These chicken burgers are amazing! I came up with them when I was craving a gyro and wanted similar flavors without all the fat and calories. The seasoning mix is what makes these...well that and the tzatziki sauce which is basically just a big word for a creamy cucumber sauce.

Burgers:
Ground Chicken - 1 lb.
Egg - 1 whole
Oregano - 1 1/2 tsp.
Dill - 1 tsp.
Parsley - 1 tsp.
Garlic Cloves - 4 cloves chopped
Pepper - 1/2 tsp.
Salt - 1 tsp.
Olive Oil - 3 tsp. (for cooking)


1. Mix the spices, garlic and egg with the ground meat in a bowl. The best tool for this is clean hands. This mixture is going to be very loose and moist because of the addition of the egg, but that is what keeps it moist and delicious when you eat it....unlike some other chicken burgers I've tried. I didn't want to add carbs by adding a binder like breadcrumbs or panko so this recipe does not lend well to grilling. You really need to cook the burgers in a skillet or I'm afraid they might fall apart. Another option is to shape them into meatballs. It also makes them easier to serve without the bun, but for tonight I was craving some carbs too.

2. Heat a large skillet over medium high heat with a couple of teaspoons of olive oil in the pan to help to keep the burgers from sticking. Now that the meat mixture is combined, this is also your opportunity to do a little taster burger. Just grab a small bit of the mixture and fry it up to check your seasoning. If you want more salt or pepper or garlic or whatever, now is the time to add it...before you portion and cook your burgers.

3. I portion four burgers out of a pound of meat, so each is basically a quarter pounder. So these are pretty big burgers. You can portion them up ahead of time and refrigerate until you are ready to cook them. This will probably even help them set up a little more too.

4. Cook up the burgers over the medium-high heat. You want to get some carmelization on the burgers...that equals flavor, so don't be afraid to crank the heat. Also keep in mind that chicken needs to be cooked all the way through to at least 160 degrees. If you don't have one, I suggest investing in a meat thermometer. Ours has really been a life-saver. Josh loves it when he is grilling too, no more guessing game about if it is done or not. Plus it has a simple chart on it that reminds us what temp each protein should be cooked to. It is super helpful!

Tzatziki Sauce:
Plain Greek Yogurt - 6 oz. fat-free
Lime Juice - From 1/2 a lime
Cucumber - 1/2 cucumber shredded
Dill - 1 tsp.
Cilantro or mint - 2 tbsp.
Salt & Pepper - To taste

1. Grate 1/2 cucumber on a box grater and add to Greek yogurt and lime juice. Chop herbs and add to mixture. Salt and pepper to taste.

2. I top the burgers with the tzatziki and serve a little on the side for dipping too. I slice the remaining half of the cucumber to top the burgers along with lettuce, tomato, onion, whatever else you might like on a burger or gyro.

3. I served it on a sandwich thin bun because I wanted a little bread but not too much. You could also serve on a pita or tortilla or with no bread of any kind. It is so full of flavor you don't really need the bun. I ate the leftovers for lunch the next day sans carbs and it was still just as satisfying.


All in with the sandwich thin bun, sauce, toppings and all, it still only came in at 370 calories. If you want to go the low-carb option, the burger is 208 calories on it's own and completely carb free. Both are delicious!

Nutrition Information per serving from Myfitnesspal.com
Greek Chicken Burger w/ Tzatziki on Sandwich Thin 370 Calories, 17g. fat, 25g. carbs, 33g. protein
Greek Style Chicken Burger Plain - 208  Calories, 12g. fat, 0g. carbs, 24g. protein.

Wednesday, July 31, 2013

Peanut Butter Yogurt Dip


Serves 2

Recipe Level: Super Easy

It is crazy to think these three little ingredients can make something so yummy. This is one of those cases where the whole is greater than the sum of its parts. I know this recipe might sound a little too easy. But it really is a game changer. It takes an apple from eh to OMG. I feel like I am indulging in some sinful treat every time I eat it. So I encourage you to give it a try and feel free to change it up and let me know how it goes. Oh and kids will love this healthy treat! Just make sure there are no peanut allergies.

Fat Free Greek Yogurt - 1 serving (6 oz.) vanilla or plain
Natural Peanut Butter - 2 tbsp.
Stevia - 1 packet or to taste

1. Mix up all the ingredients in a small bowl.

2. This makes two portions (because I like to eat a lot of it) but it could probably go a little further. I portion it out into little dressing cups with the lids and keep them in the fridge so I can grab them on the go.


I usually eat this with apples but it would be good on just about anything (celery, carrots, crackers, pretzels, you name it). Another great option is to slather between to slices of banana and freeze for a yummy frozen treat.

Nutrition Information per serving from Myfitnesspal.com
Peanut Butter Yogurt Dip - 150 Calories, 8g. fat, 11g. carbs, 11g. protein

Tuesday, July 23, 2013

Baked Panko Mozzarella Sticks


Serves 8

Recipe Level: Easy


Low Fat Mozzarella String Cheese - 4 sticks
Egg - 1 large whole
Panko Bread Crumbs - 1/3rd cup
Parmesan Cheese - 2 tbsp.
Kosher Salt - Dash
Garlic Powder - 1/4 tsp.
Dried Oregano - 1/4 tsp.
Dried Basil - 1/4 tsp.
Black Pepper - 1/4 tsp. or a couple grinds
Olive Oil - 1 tsp.

1. Preheat oven to 475 degrees.

2. In a small bowl or pie pan, beat egg with fork. In another bowl combine the panko bread crumbs, Parmesan cheese, salt, garlic powder, oregano, basil and pepper.

3. Brush a baking sheet with 1 tsp. of olive oil to cover the bottom so the sticks won't stick.

4. Cut each string cheese stick in half.

5. Roll each stick in the egg mixture first then move to the panko and Parmesan mixture. You will want to have one "wet hand" and one "dry hand" so your fingers don't get caked with the breading.


5. Once the sticks are coated, transfer them to the oiled baking sheet. Bake for 8-10 minutes, or until the breading is nice and browned. You'll want to keep and eye on them, so don't go too far while they are baking.

6. Serve them hot out of the oven while the cheese is still ooey gooey good. They are great on their own or with marinara sauce.


Nutrition Information per serving from Myfitnesspal.com
Baked Mozzarella Sticks (per stick) - 56 Calories, 3g. fat, 3g. carbs, 5g. protein

Monday, July 22, 2013

Joyful Almond Bites


Serves 12

Recipe Level: Easy


I went back and forth on putting the word vegan in the title of this recipe. I didn't want to scare anyone off thinking these little bites are anything but chocolately coconutty goodness. VEGAN CAN BE YUMMY TOO!!! These are also gluten-free and paleo friendly so everyone can enjoy these little treasures.

Coconut Oil - 1/3rd cup
Creamy Almond Butter - 1/3rd cup
Truvia Baking Blend - 2 tbsp. or 1/4 cup Agave Nectar (for paleo)
Vanilla Extract - 1/2 tsp.
Cocoa Powder - 1/3rd cup
Shredded Coconut - 4 tbsp.
Slivered Almonds - 4 tbsp.
Kosher or Sea Salt - sprinkle

1. Mix coconut oil, almond butter, Truvia or Agave, vanilla extract, and cocoa powder in a blender. Mix for a couple minute or until the mixture comes together and is very smooth. Let the mixture sit for a few minutes so the air bubbles will rise to the surface.

2. While your mixture is setting, take a little over half your almonds and coconut and add to the bottom of a silicon mini-muffin tin or a regular mini-muffin tin lined with cupcake wrappers.

3. Pour your chocolate mixture over the coconut and almonds trying to get even amounts in each cup.


4. Take a toothpick or small knife and run it through the mixture in each cup to make sure it coats the coconut and almonds on the bottom and to ensure all the air bubbles are out.

5. Take the reserved almonds and coconut and sprinkle a little on the top of each chocolate cup. Then add a little sprinkle of salt to the top of each too. A little dab will do you here, you don't want too much salt, but a little brings out the cocoa flavor.

6. You can place in the fridge or freezer depending on how patient you are to let them set. They are usually good to go after 10 minutes in the freezer or 30 minutes in the fridge. You will need to keep them refrigerated or frozen because the coconut butter melts just above room temperate. I usually just leave them in the freezer because I love when they are nice and frosty.

Enjoy!

Nutrition Information per serving from Myfitnesspal.com
Joyful Almond Bites - 132 Calories, 12g. fat, 5g. carbs, 2g. protein

Chocolate Chip Banana Oat Cookies


Serves 12

Recipe Level: Easy


This is my go to recipe anytime I have old bananas that I need to use up. You want to make sure your bananas are nice and ripe with lots of spots so they will mash up and become these yummy cookies. These cookies are also very versatile. You can easily make them vegan and gluten-free friendly so everyone can enjoy them. And they clock in at only 70 calories each and provide fiber and protein to keep you full. When was the last time a cookie was so good to you?

Banana - 1 medium to large ripe 
Peanut Butter - 2 tbsp.
Apple Sauce - 1/3rd cup
Vanilla Protein Powder - 1 scoop low carb.
Vanilla Extract - 1 tsp.
Old Fashioned Oats - 3/4 cup
Chocolate or Carob Chips - 3 tbsp.

1. Preheat oven to 350 degrees.

2. In a mixing bowl combine mashed banana, peanut butter, apple sauce and vanilla.

3. Stir in the protein powder. If you are making vegan cookies make sure to use a soy based protein powder or one that does not include any milk products.

4. Add in the old fashioned oats. If you are making this gluten-free make sure you are using gluten-free oats. 

5. Line a baking sheet with a silicon baking pad. This dough is relatively loose and has a tendency to stick if you don't use the silicon. 

6. Portion out the dough in 1 inch balls/globs on the silicon sheet. Like I said, the dough is pretty loose so it isn't going to look perfect. 

7. Add a few chocolate chips to the top of each cookie and press them in. It is easier to stretch the chocolate chips if you add them to the top of each cookie rather than mixing it into the dough. You want them to be the same thickness in the middle so they bake evenly. Don't be afraid to press them down a bit.

8. Bake for 20 minutes. These are great warm right out of the oven or room temperature. They stay nice and soft and will keep for a couple days.


Nutrition Information per serving from Myfitnesspal.com
Chocolate Chip Banana Cookies - 70 Calories, 3g. fat, 9g. carbs, 4g. protein

Tuesday, July 9, 2013

Quacamole Cups


Serves 4 (two little cups each)

Recipe Level: Easy


I have been meaning to post this recipe for a while. It is a great way to class up the classic guacamole. I make this recipe all the time, it is a great Summer dish. Anytime I can find good ripe avocados at the store, I plan to make guacamole. You want them to be a little soft but not mushy. If you can't find any ripe ones, you can speed up the ripening process by placing them in a brown paper bag on the counter for a couple days. Don't refrigerate your avocados! (or your tomatoes for that matter)

This makes a great dip with tortilla chips, veggies or if you want the fancier version you can do the cups too. I also like because it helps with portion control. Otherwise I might want to eat a whole bowl of this stuff.


Avocado - 1 large
Tomato - 1/2 small or 3-4 grape
Jalapeno - 1/4 - 1/2 medium
Onion - 1/4 small
Cilantro - 2 tbsp. chopped
Lime - 1 small
Wonton Wrappers - 8
Salt - To taste
Cayenne Pepper - To taste (optional)
Feta Cheese or Queso Fresco - 4 tbsp.

1. Preheat oven to 350 degrees.

2. Spray a muffin tin with olive oil. If you don't have spray you can drop a bit into each muffin cup and spread around with a basting brush or papertowel. Press one wonton wrapper into each muffin cup so that it covers the bottom and comes partly up the sides. Bake in the over for 6-8 minutes or until the wontons are slightly browned and crispy.

3. I always chop all my veggies before I slice open the avocado since they have a tendency to brown. You want everything diced finely, I usually start with the onion, then tomato, then jalapeno and add them to a bowl. I usually remove the seeds and ribs from the jalapeno because I don't want it too spicy, but feel free to leave them if you like a lot of spice.  Add two tablespoons of chopped cilantro to the mix of vegetables along with the juice of half the lime.

4. Slice the avocado in half. I don't usually worry about removing the pit yet. Once the avocado is cut in half, take a large spoon and slip in around the avocado between the soft flesh and the tough skin. If it is ripe it should come right out. Just scoop the flesh into the bowl with the chopped veggies. Then just pick the pit out.

5. I add the other half of the lime juice on top of the avocado to help keep it from browning then mash all ingredients together with a potato masher. I don't like mine super chunky but I also don't want it to be complete mush, I like a little texture. This is also your opportunity to add cayenne pepper and salt. This is really to taste and depends a little bit on how juicy your lime is. The more juice you get out, the less salt you should need. I usually just do a pinch of cayenne on top for a little color.


6. Once you have the guacamole to the consistency and seasoning level that you like, spoon it into the cooled wonton cups. Top with feta or queso fresco and the remainder of cilantro.

Nutrition Information per serving from Myfitnesspal.com
Two Guacamole Cups - 134 calories, 8g. fat, 15g. carbs, 5g. protein

Sunday, June 30, 2013

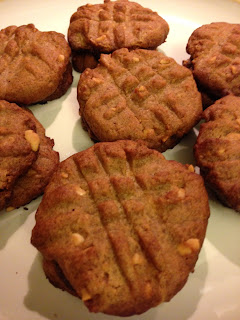
Gluten Free Peanut Butter Cookies


Serves 14

Recipe Level: Easy

The original recipe for this came from my sister Laura. I have also seen several variations online. I made a few adjustments to take out some additional calories too. But trust me you will never miss the flour in the cookies and they could not be easier to make. They have become a hit with anyone whom I've shared the recipe with.

Peanut Butter - 1 cup all natural
Truvia Baking Blend - 1/4 cup
Brown Sugar - 1/2 cup
Egg - 1 whole
Vanilla - 1 tsp.
Kosher or Sea Salt - 1/4 tsp.

1. Preheat oven to 375 degrees.


2. Measure peanut butter, truvia, sugar and vanilla into a mixing bowl. I like to use chunky peanut butter for a little texture but any kind will work. Mix for one to two minutes with a hand mixer. The batter will be quite thick, so once it comes together, scrape down the sides of the bowl. You could also stir in chocolate chips or chopped nuts at this point too.

3. With clean hands portion the batter into one inch balls and place on a baking sheet.

4. Press each ball down with a fork in a cross hatch pattern that is traditional for peanut butter cookies.


5. Sprinkle the tops of each cookie with just a pinch of coarse sea salt or kosher salt.

6. Put cookies in the oven and bake for 10 minutes. Then enjoy warm or at room temperature.


Nutrition Information Provided by Myfitnesspal.com
Gluten-Free Peanut Butter Cookies - 146 calories, 10g. fat , 14g. carbs, 4 g. protein