Sunday, June 30, 2013
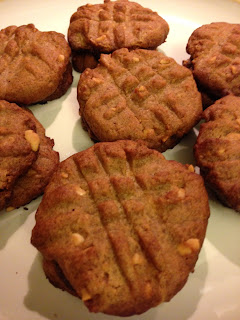
Gluten Free Peanut Butter Cookies
Serves 14
Recipe Level: Easy
The original recipe for this came from my sister Laura. I have also seen several variations online. I made a few adjustments to take out some additional calories too. But trust me you will never miss the flour in the cookies and they could not be easier to make. They have become a hit with anyone whom I've shared the recipe with.
Peanut Butter - 1 cup all natural
Truvia Baking Blend - 1/4 cup
Brown Sugar - 1/2 cup
Egg - 1 whole
Vanilla - 1 tsp.
Kosher or Sea Salt - 1/4 tsp.
1. Preheat oven to 375 degrees.
2. Measure peanut butter, truvia, sugar and vanilla into a mixing bowl. I like to use chunky peanut butter for a little texture but any kind will work. Mix for one to two minutes with a hand mixer. The batter will be quite thick, so once it comes together, scrape down the sides of the bowl. You could also stir in chocolate chips or chopped nuts at this point too.
3. With clean hands portion the batter into one inch balls and place on a baking sheet.
4. Press each ball down with a fork in a cross hatch pattern that is traditional for peanut butter cookies.
5. Sprinkle the tops of each cookie with just a pinch of coarse sea salt or kosher salt.
6. Put cookies in the oven and bake for 10 minutes. Then enjoy warm or at room temperature.
Nutrition Information Provided by Myfitnesspal.com
Gluten-Free Peanut Butter Cookies - 146 calories, 10g. fat , 14g. carbs, 4 g. protein
Saturday, June 29, 2013
Homemade Breakfast Sausage
Serves 12
Recipe Level: Easy
I came up with this recipe after reading the ingredient list on most pre-packaged sausages. I suffer from migraines and one of the worst triggers for me is MSG. After all the bad press MSG has gotten, I am amazed at how many products still contain it. I think it is because many people don't know what to look for. MSG is short for monosodium glutamate and the FDA does require for it to be listed on the label but no company is going to put Contains MSG in big bright letters on the front of the label. So if you want to avoid it, know what to look for. Here is the ingredient list of a very popular sausage brand.
INGREDIENTS: PORK, WATER, SODIUM LACTATE, SALT, SPICES, SUGAR, SODIUM PHOSPHATES, MONOSODIUM GLUTAMATE, SODIUM DIACETATE, CARAMEL COLOR.
Notice that in addition too salt, there are four other ingredients containing sodium. Pretty crazy huh? My recipe contains about a 1/4 of the amount of sodium in traditional store-bought sausage.
If you have a grinder, I recommend grinding your own spices, if not you can buy ground spices. I actually used a combination of whole spices I grinded and pre-ground spices just depending on what I had on hand. It can be difficult and expensive to find some whole spices, so if you have ground spices in your cupboard or spice rack, just use those.
Ground Pork (or Turkey) - 1 lb.
Kosher Salt - 1 tsp.
Brown Sugar - 1.5 tbsp.
Savoury or marjoram - 1 tsp.
Sage - 1 tsp.
Crushed Red Pepper 1/2 tsp.
Black Pepper 1/2 tsp.
Fennel Seeds 1/2 tsp.
Cloves 1/4 tsp.
Rosemary 1/2 tsp.
1. Grind any whole spices. (I ground up the dried rosemary, fennel seeds, and cloves in my spice grinder) You could also use a mortar and pestle if you don't have a spice grinder. You can also just buy a coffee grinder but make sure you have one solely dedicated to grinding spices or you will end up with some funny tasking coffee. You can check out some great options for grinders here.
2. Put your ground meat in a large bowl. (you can use pork, turkey or a combination of both, if you have a meat grinder, you can grind your own, or just buy natural ground meat at the store) Add all the spices, salt and sugar. This includes your pre-ground spices and anything you've ground yourself. You'll note that my recipe calls for savoury which may be hard to find. It is common in Newfoundland where Josh's family is from and I used some his mother brought back. I have also seen it in specialty spice shops here in the US. If you can't find it or don't have the time, you can use marjoram which I have seen in a lot of other recipes.
3. Mix the spices into the meat with clean hands. You want the spices evenly distributed through the mixture and the best way to do that really is with your hands. You also don't want to overmix, so once it looks like it is coming together, stop mixing.
4. Make one very small ball and press out into a patty no bigger than one inch. This is your tester so you want it to cook up quick. Add this to a hot skillet and it should cook up in a couple of minutes. This is your chance to check the seasoning before portioning out all your patties. You can add more salt, sugar or spices depending on your preferences. I recommend doing a tester portion anytime you are making patties for burgers, crab cakes, or anything that contains raw ingredients. Tasting your food is an important part of the cooking process and I think this step often gets missed.
5. Once you are satisfied with the taste of your tester, portion out your patties. I make about 12 patties out of a pound of meat, so each portion is a little over an ounce. You can make them larger or smaller depending on your needs, but keep in mind the nutritional information will change then. Press your thumb down in the middle of the patty to create a little well, this will help them cook evenly.
6. Cook in a skillet on medium heat. (you want it pretty hot to get a nice brown on the meat) If you are using ground pork, you should not need any oil, if you are cooking with turkey you may want to spray a bit of olive oil in the pan since it is much leaner. Cook for 3-4 minutes on each side or until cooked through.
7. Once I remove them from the pan, I put them on a plate covered with a papertowel to remove excess grease. Serve with eggs, pancakes, or whatever sounds good to you, and enjoy!
Nutrition Information per serving from Myfitnesspal.com
Pork Breakfast Sausage - 106 calories, 8g. fat, 2. carbs, 6g. protein
Turkey Breakfast Sausage - 62 calories, 3g. fat, 2g. carbs, 7g. protein
Half & Half Breakfast Sausage - 83 calories, 6g. fat, 2g. carbs, 7g. protein
Thursday, June 20, 2013
Vanilla Cupcakes with Almond Buttercream Frosting
Serves 12
Recipe Level: Medium
This recipe came out of trying to replicate the best cupcake I've ever had. There is a little bakery here in Oklahoma City that had an amazing vanilla cupcake with almond frosting. And let's be honest, it's really about the frosting. For Josh's birthday I tried to replicate that flavor but lighten it up again. It is still a splurge but maybe not a through the whole day off kind of calorie splurge.
The you can find the original recipe for vanilla cupcakes here. I lightened them up first by cutting the recipe in half. I definitely don't need two dozen cup cakes around no matter whose birthday it is. I also swapped out the sugar for Truvia Baking blend (this is half regular sugar and half stevia). I really like the baking blend because since it still includes some sugar it doesn't affect the texture too much. I also swapped out the whole milk for skim milk to cut out some of the fat. In the frosting, I made several changes since I was going for almond buttercream anyway. I cut down on the sugar since I find many frostings overly sweet anyway and I swapped out some of the butter for reduced-fat cream cheese and whipped topping. All in all I shaved over 100 calories, 20 grams of sugar and 4 grams of fat from each cupcake.
Vanilla Cupcakes:
Butter - 1 stick unsalted at room temperature
Truvia Baking Blend - 1/2 cup
Eggs - Two whole large at room temperature
Vanilla Extract - 1 tsp.
Skim Milk - 1/2 cup at room temperature
Flour - 1 1/3 cup all purpose
Baking Soda - 1/4 tsp.
Baking Powder - 1/2 tsp.
Kosher Salt - 1/4 tsp.
1. Get butter, eggs, cream cheese and milk out of the refrigerator about 30 minutes ahead so they can come up to room temperature before you mix them.
2. Preheat oven to 350 degrees. And line a muffin tin with cupcake wrappers.
3. In a small bowl sift together the flour, baking soda and baking powder and add salt. Set aside.
4. With a stand mixer or handheld mixer, cream together one stick of butter and 1/2 cup Truvia baking blend. Then add in eggs one at a time, then vanilla and milk.
5. Slowly add the dry ingredients to the wet ingredients mixing about a third of the dry in at a time.
6. Once the batter has come together, spoon into lined muffin tins. I like to use an icecream scoop for this. You want to fill them about 3/4 full. You can make 12 standard cupcakes or 6 jumbo depending on what pans you have on hand.
7. Bake for 25 minutes at 350 degrees.
Almond Buttercream Frosting:
Butter - 2/3 stick unsalted at room temperature
Powdered Sugar - 1 cup
Light Cream Cheese - 4 oz. 1/3rd less fat at room temperature
Almond Extract - 2 tsp.
Light Whipped Topping - 6 tbsp.
I don't usually start my frosting until the cupcakes our out of the oven because the cupcakes need time to cool before you frost them. If you want to start the frosting while the cupcakes are baking, you can just place it in the fridge while you are waiting for the cupcakes to cool.
1. With your hand mixer cream together the butter, powdered sugar and light cream cheese. Once it starts to come together add the almond extract and mix a little more. You don't want to over mix though.
2. Fold in the light whipped cream topping into the frosting mix. This will give the frosting a light and airy quality. If you wanted to use real whipping cream and make your own you could as well. But this is the quick, easy and light version.
3. Transfer the frosting into a piping bag if you have one. If not, a quart size ziplock bag will work just fine. I put the bag in a large cup and fold the edges over (like in the photo above) to make it easier to transfer the frosting. Once the frosting is in the bag, snip about a 1/2 inch off one corner.
4. Frost the cupcakes from the outside in, making smaller and smaller circles as you pipe around the cupcake. I topped mine with some slivered almonds for a little crunch and a fresh cherry for some color.
Nutrition Information per serving from Myfitnesspal.com
Vanilla Cupcakes with Almond Buttercream Frosting - 261 Calories, 16g. fat, 26g. carbs, 4g. protein
Thursday, June 13, 2013
Protein Fueled Banana Pancakes with Strawberry Sauce
Serves - 2
Recipe Level - Easy
This has become one of the most popular recipes in our house. I make these at least once a week. This is a combination of a couple of other pancake recipes that I modified until they were just how I liked them. I know it sounds like an odd mix of ingredients but they come out tasting kind of like little banana cheesecake crepes. They contain no refined sugar or flour which significantly cuts down on the carbs. They are thin, but the recipe usually yields 3-4 per person depending on how large you make them. Oh yeah and they are delicious!
Pancakes
Banana - 1 Large Ripe Banana
Eggs - 2 whole large
1/3rd Less Fat Cream Cheese - 2 tbsp.
Vanilla Protein Powder - 1 scoop (Isopure zero carb)
Baking Powder - 1 tsp.
I like to use my immersion blender for this recipe because it makes for very easy clean up but you could use a regular blender as well. I like to cook them on my electric griddle for more surface area when I am making them for a crowd, if it is just Josh and me, I just use a non-stick skillet. Either will work just fine.
1. Put all ingredients in blender (or bowl or cup attachment if using an immersion blender). Mix for about a minute or until all the ingredients are mixed and the batter is smooth. This will be a little thinner than traditional pancake batter and more along the lines of a crepe batter.
2. Once the batter is mixed, let it stand for at least a minute or two to let any extra air bubble up to the top. While the batter is settling, heat up your griddle or skillet to medium heat and spray with a little olive oil or non-stick spray.
3. Once the pan is hot, add the batter. I like using the blender so I can just pour a little at a time without making a mess. You want to keep the pancakes pretty small, since they are thin they are hard to flip if they are too large.
4. Once you start to see bubbles forming in the batter, flip and cook just a few minutes on the second side.
5. If you are making them for a crowd you can keep them warm in an oven set at 250 degrees until ready to serve them. They are delicious on their own or if you are trying to keep it low carb you can serve with sugar-free syrup or peanut butter. I sometimes like to serve them with a quick strawberry sauce.
Strawberry Sauce
Strawberries - 1 cup frozen
Agave Nectar - 1 tbsp.
Apple Cider Vinegar - 1/2 tbsp.
1. Combine all ingredients in a small saucepan. You could substitute Splenda or Stevia for the agave nectar if you want to cut more of the carbs. You can also replace the vinegar with lemon juice, you just need a touch of acid.
2. Bring the ingredients to a simmer for about 5 minutes. The strawberries will soften and the sauce will begin to come together. If you have an immersion blender you can blend right in the pan or transfer the mix to a blender and pulse for a few seconds. **Be very careful when blending any hot liquid. If you are using a traditional blender, you can put a kitchen towel between the top of the blender and the lid to trap any liquid if it decides to spurt out.
3. Pour the berries over the yummy pancakes and serve while warm. This sauce is great on ice cream or yogurt too.
Nutrition Information per serving from Myfitnesspal.com
Banana Pancakes - 218 Calories, 8g. fat, 19g. carbs, 20g. protein
Strawberry Sauce - 68 Calories, 0g. fat, 18g. carbs, 1g. protein.
Monday, June 3, 2013
Lemon Chicken and Broccoli
Serves - 2
Recipe Level: Easy
This is a quick and easy weeknight recipe. Can be done start to finish (from frozen) in less than 30 minutes.
Frozen Chicken Breast Tenders - 4 tenders (two per person)
Olive Oil - 2 tsp.
Lemons - 2 Whole Lemons
Paprika - 1 tsp
Garlic Powder - 1 tsp
Pepper - 1 tsp
Salt - tsp
Crushed Red Pepper - 1/2 tsp
Chopped Garlic - 1 tsp
Broccoli - one crown
Ok I know, I know, frozen chicken tenders aren’t the best option when it comes to chicken, however when it comes to convenience, they are hard to beat. I usually keep a package in the freezer for quick and easy weeknight meals. It is also worth noting that not all brands are created equal so if possible try to go with an organic or solution free option.
1. Pre-heat oven to 400 degrees.
2. Add chicken tenders to baking dish. This recipe is for two but is very easy to make much more. I figure two tenders per person, if you have big eaters, you may want to figure for three. Spritz chicken with olive oil. I love my oil spritzer, it is an easy way to cut back on the amount of oil you use without having to use cooking spray with all the extra unwanted ingredients. Here are some great options if you don't have one.
3. Sprinkle garlic powder, paprika salt and pepper over the chicken. Don’t skip the paprika, it ads a nice golden color to the finished product and imparts a very subtle smokey flavor that pairs well with the lemon.
4. Slice one of the lemons very thinly. You will want at least 8 slices, two per chicken tender and the thinner they are, the more concentrated and yummy the flavor will become. The lemon also helps to keep the chicken moist which can be hard to do when working with boneless skinless white meat because it is so lean.
5. Cover each tender with two lemon slices then place in the oven and set timer for 20 minutes.
6. While the chicken is baking, cut up broccoli. I usually buy the broccoli crowns which are slightly more expensive per pound, but usually don’t have much use for the stems unless I plan on making broccoli slaw. (The stems are great for this, you can grate in a food processor or on a box grater but that’s another recipe) I usually cut the broccoli into pretty small florets so that it cooks up quickly but it is all about your personal taste.
7. Add the broccoli florets to a separate baking dish and coat with olive oil (I used about 3-4 spritzes, we are trying to keep this light).
8. Zest the second lemon with a microplane (this is much easier than traditional grater). Here are some great options. Add half of the zest from the lemon to the broccoli (set aside the other zest and lemon for later) Add the chopped garlic (you can use fresh chopped or jarred pre-chopped depending on how pressed for time you are) salt and pepper and crushed red pepper for a little extra spice. If you are cooking for kids, you may want to leave this part out though.
9. Mix everything together with tongs or don’t be afraid to use your hands as long as they are clean. At this point there should be about 10 minutes left on the timer, so go ahead and place the broccoli in the oven and cook for the remaining 10 minutes.
10. When the timer sounds, turn the oven on broil and make sure both dishes are on the top shelf of your oven. Broiling will ensure the lemons get nice and carmelized and the broccoli has that lovely roasted quality. This will take about 3-5 minutes, but really depends on your oven, so don’t go anywhere during this process.
11. Remove the chicken and broccoli from the oven. Cut the remaining lemon (the one you already zested) in half and squeeze over the broccoli, add the remaining lemon zest and toss to coat the broccoli. (I use the whole lemon because love lemon, but you may want to cut back to half of the lemon if you don’t want it too tart.) If you want to extra texture of flavor, you could add in some slivered almonds or crumbled feta.
If you want to serve with a starch you could cook up some quick cooking brown rice, polenta or quinoa while the chicken and broccoli are roasting in the oven. I had some left-over quinoa tabouleh salad I served along with mine. You can check out that recipe here.
Nutrition Information per serving from Myfitnesspal.com
Lemon Chicken - 209 calories, 8.2g. fat, 1.3g. carbs, 34.6g. protein
Broccoli - 64 calories, 4.7g fat, 6g. carbs, 1.5g protein
Berry Crumble
Serves - 2
Recipe Level: Easy
This is one of my favorite Summer desserts. You could substitute raspberries, blackberries, cherries or whatever you have on hand or is in season. It is a lightened up version of similar recipes I have found for crisps and crumbles. I lightened it up mostly by swapping out the sugar for Truvia and significantly cut down the amount of butter and added in nuts for their healthy fat and some texture. But trust me, it will still satisfy your sweet tooth.
Filling:
Strawberries - 6 medium frozen or raw
Blueberries - 1/2 cup frozen or raw
Truvia Baking Blend - 2 tsp
Corn Starch - 1 T
Lemon Juice - 1 tsp.
Crumble:
Old Fashioned Oatmeal - 3 T Dry
Wheat flour - 2 T
Butter - Unsalted, room-temperature 1 T
Slivered Almonds, 2 T.
Cinnamon - 1 tsp
Truvia Baking Blend - 4 tsp
1. Preheat oven to to 400 degrees.
2. In a large bowl mix together filling ingredients and mix so that cornstarch is coating all the fruit. Then spoon into two individual baking ramekins, splitting the berries evenly between the two. I love individual sized desserts because they have built-in portion control. They are relatively affordable so I suggest purchasing a set. Here is a link to a set like mine.
3. In another bowl (or in the same bowl once you've removed the berries and rinsed out) combine the crumble ingredients. You will need to mix in the butter with your fingers, so make sure you have clean hands then go to work. You want to crumble to slightly ball together in your hands, but since the butter has been significantly cut back in this recipe, it is still going to be a little crumbly, hence the name of the recipe.
4. Once you have the crumble combined spoon on top of the berries in the individual ramekins. Place the ramekins onto a baking sheet (sometimes the berries bubble over and can make a mess in the oven so this is just to prevent that). Place the baking sheet with the ramekins into the preheated oven for 35 minutes.
5. Serve all on their own or with whipped cream, ice cream, greek yogurt, whatever your favorite topping is.
Nutrition Information per serving from Myfitnesspal.com
Berry Crumble - 217 calories, 10g. fat, 28g. carbs, 4g protein
Subscribe to:
Posts (Atom)